
I lost R1,200 in under a minute because I didn't understand my forex board.

David van der Merwe
Emerging Markets Trader ·  South Africa
☕ 10 min read
What you'll learn:
- 1What Exactly Is a Forex Board?
- 2Reading the Board: A South African Perspective
- 3How to Use the Board to Make Trading Decisions
- 4Common Mistakes (And How to Avoid Them)
- 5Setting Up Your Trading Platform's Board
- 6Forex Board vs. Trading Chart: What's the Difference?
- 7Next-Level Techniques for the Forex Board

I lost R1,200 in under a minute because I didn't understand my forex board. I saw USD/ZAR at 18.45 and thought it was a screaming buy. What I missed, tucked away in a tiny column, was that the spread was 45 pips wide during a news event. By the time my market order filled at 18.495, the price had already reversed. That screen full of numbers isn't just decoration, it's your mission control. Getting it wrong costs you real money before you even place a trade.
Forget fancy jargon. Your forex board is simply the main screen on your trading platform where all the currency pairs are listed with their live prices. It's like the JSE's ticker tape, but for global currencies. On MetaTrader, it's the 'Market Watch' window. On other platforms, it might be called a 'Quote List' or 'Symbols' window.
When you first open it, it can look overwhelming. You've got columns for Bid, Ask, maybe daily high/low, and a bunch of other numbers. The core function is simple: it shows you the current price to sell (Bid) and the current price to buy (Ask) for every instrument. The difference between those two is the spread, which is your immediate cost of trading. I made the mistake of only looking at the 'last price' column for years, ignoring the spread until that costly USD/ZAR trade taught me otherwise.
Warning: The prices on your forex board are only as live as your broker's feed. During high volatility, like when the SARB makes an interest rate announcement, the lag between the price you see and the price you get can be significant. This is called slippage.
Let's break down what you're actually looking at, with our local pairs in mind.
The ZAR Pairs
Your board will likely be dominated by majors like EUR/USD, but for us, the ZAR pairs are where the real local action is. You'll see USD/ZAR, EUR/ZAR, and GBP/ZAR most prominently. The price is quoted as how many Rands it takes to buy one unit of the foreign currency. So if USD/ZAR is at 18.50, it costs R18.50 to buy $1.
A critical thing to internalise: a move from 18.50 to 18.55 is a 5-pip move, but in Rands, that's a 5-cent move per dollar. On a standard lot (100,000 units), that's a R5,000 move. This is why proper position size calculator use is non-negotiable for South African traders. The volatility can wipe out an account fast.
The Bid, Ask, and Spread
This is the heart of it. Let's use EUR/ZAR as an example:
- Bid: 19.8000. This is the price the market will pay you if you SELL EUR/ZAR right now.
- Ask: 19.8050. This is the price the market will charge you if you BUY EUR/ZAR right now.
- Spread: 0.0050, or 5 pips. This is the broker's cut and your instant loss on the trade.
You buy at the Ask and sell at the Bid. So, the price needs to move in your favour by at least the spread amount just for you to break even. I always check the spread column before clicking. A spread that's 3x its normal width is the market telling you to stay away.
Example: You buy 1 mini lot (10,000 units) of EUR/ZAR at 19.8050. The spread is 5 pips. The price moves to 19.8100. Have you made profit? No. To sell at the new Bid, the price would be 19.8050 (Ask of 19.8100 minus the 5-pip spread). You're at breakeven. You need the Ask to hit 19.8105 for the Bid to be 19.8055, giving you a 0.5-pip profit.

💡 Winston's Tip
Your forex board is a mirror of your trading discipline. A cluttered, noisy board reflects a cluttered, noisy mind. Clean it up.
“The forex board is your satellite view of the entire market, while the chart is your street-level map for a single pair.”
The board isn't passive. I use it actively for three things: scanning, speed, and sentiment.
First, scanning for strength and weakness. I sort my board by percentage change on the day. If I see AUD/USD is up 0.8% while EUR/USD is down 0.3%, I know the AUD is the strong currency of the day. This can lead me to look for a long setup on AUD/JPY or avoid shorting the AUD. It's a quick, top-down view.
Second, speed for execution. When I'm scalping strategy on a fast-moving pair like GBP/USD, I don't have time to open a chart, right-click, and select 'New Order'. I have a one-click trading toolbar attached to my forex board. I see the level hit on my chart, and I can execute directly from the board in under a second. The difference between a good and bad fill can be 2-3 pips, which adds up.
Third, gauging market sentiment. Look at the depth of the Ask vs. Bid prices across multiple brokers (if you have accounts with more than one). If every Exness review and IC Markets review platform shows a huge cluster of sell orders (visible in Level II data) just above the current Ask price, you know there's a wall of resistance. The board gives you clues beyond your primary chart.
Pro Tip: Colour-code your forex board. I set all ZAR pairs to orange, major forex pairs to white, and commodities like XAU/USD guide to yellow. In a split-second glance, I know exactly what asset class I'm looking at, which prevents stupid mistakes like trading gold thinking it's a currency pair.
I've made most of these, so learn from my lost Rands.
Mistake 1: Trading During Widened Spreads. This was my intro story. Around major economic data (US Non-Farm Payrolls, SARB MPC), brokers widen spreads to protect themselves. That 2-pip spread on EUR/USD can blow out to 15-20 pips. If your strategy relies on a 5-pip stop-loss, you're already dead on entry. The fix? Check the spread column religiously. If it's abnormal, don't trade.
Mistake 2: Misreading the Quote. This sounds basic, but pressure does weird things. You see USD/ZAR at 18.30/18.32. You want to go short. You need to hit 'Sell'. But in a panic, you hit 'Buy' at 18.32. Now you're long against your plan. The fix? Slow down. Verbalise your action: "Sell at Bid: 18.30." Then click.
Mistake 3: Ignoring the 'Daily Range'. Most boards show the day's high and low. If EUR/ZAR is currently at 19.70 and the day's high is 19.72, you know there's only 20 pips of room to the upside before the price tests a level that has already rejected it today. This doesn't mean it won't break, but it tells you the odds. It's a free, built-in support/resistance indicator.
Mistake 4: Not Using Alerts. You can't stare at the board all day. Right-click on a pair and set a price alert. When USD/ZAR hits 18.75, your phone will ping. Then you can go to the chart and analyse. This turns the board into a 24-hour sentry for your swing trading ideas.
💡 Winston's Tip
The spread isn't a fee, it's a toll bridge. You must cross it to enter the trade. Always know the toll before you start the journey.
“A spread that's three times its normal width is the market shouting at you to stay away.”
A cluttered board is a useless board. Here’s how I set mine up on MT5, which is common with brokers like Pepperstone review and XM review.
- Remove the Noise: Right-click in the Market Watch window and 'Hide All'. Then, only 'Show' the pairs you actually trade. For me, that's 8 forex pairs and 2 indices. I don't need 50 cryptocurrencies cluttering my view.
- Customise Columns: I add the following columns (Right-click > Columns):
- High/Low: The daily range.
- Time: The time of the last tick (helps spot stale quotes).
- Spread: In pips. This is my most important column.
- Change %: To see relative strength.
- Sort and Group: I sort my list by asset class. All ZAR pairs are grouped at the top. Then majors, then crosses. This creates muscle memory - I know USD/ZAR is always at the top of my list.
This setup isn't static. I review it every quarter. If I haven't traded a pair in 3 months, I remove it from the board. Discipline on the board leads to discipline in the trade.
The real power comes when you connect this setup to advanced tools. Manually moving stop-losses to breakeven or setting a multi-level take-profit on a volatile pair like GBP/JPY is stressful and slow. Having a tool that lets you drag those orders directly on the chart, or set a trailing stop that automatically adjusts, changes the game. It turns your static board into a dynamic command centre.
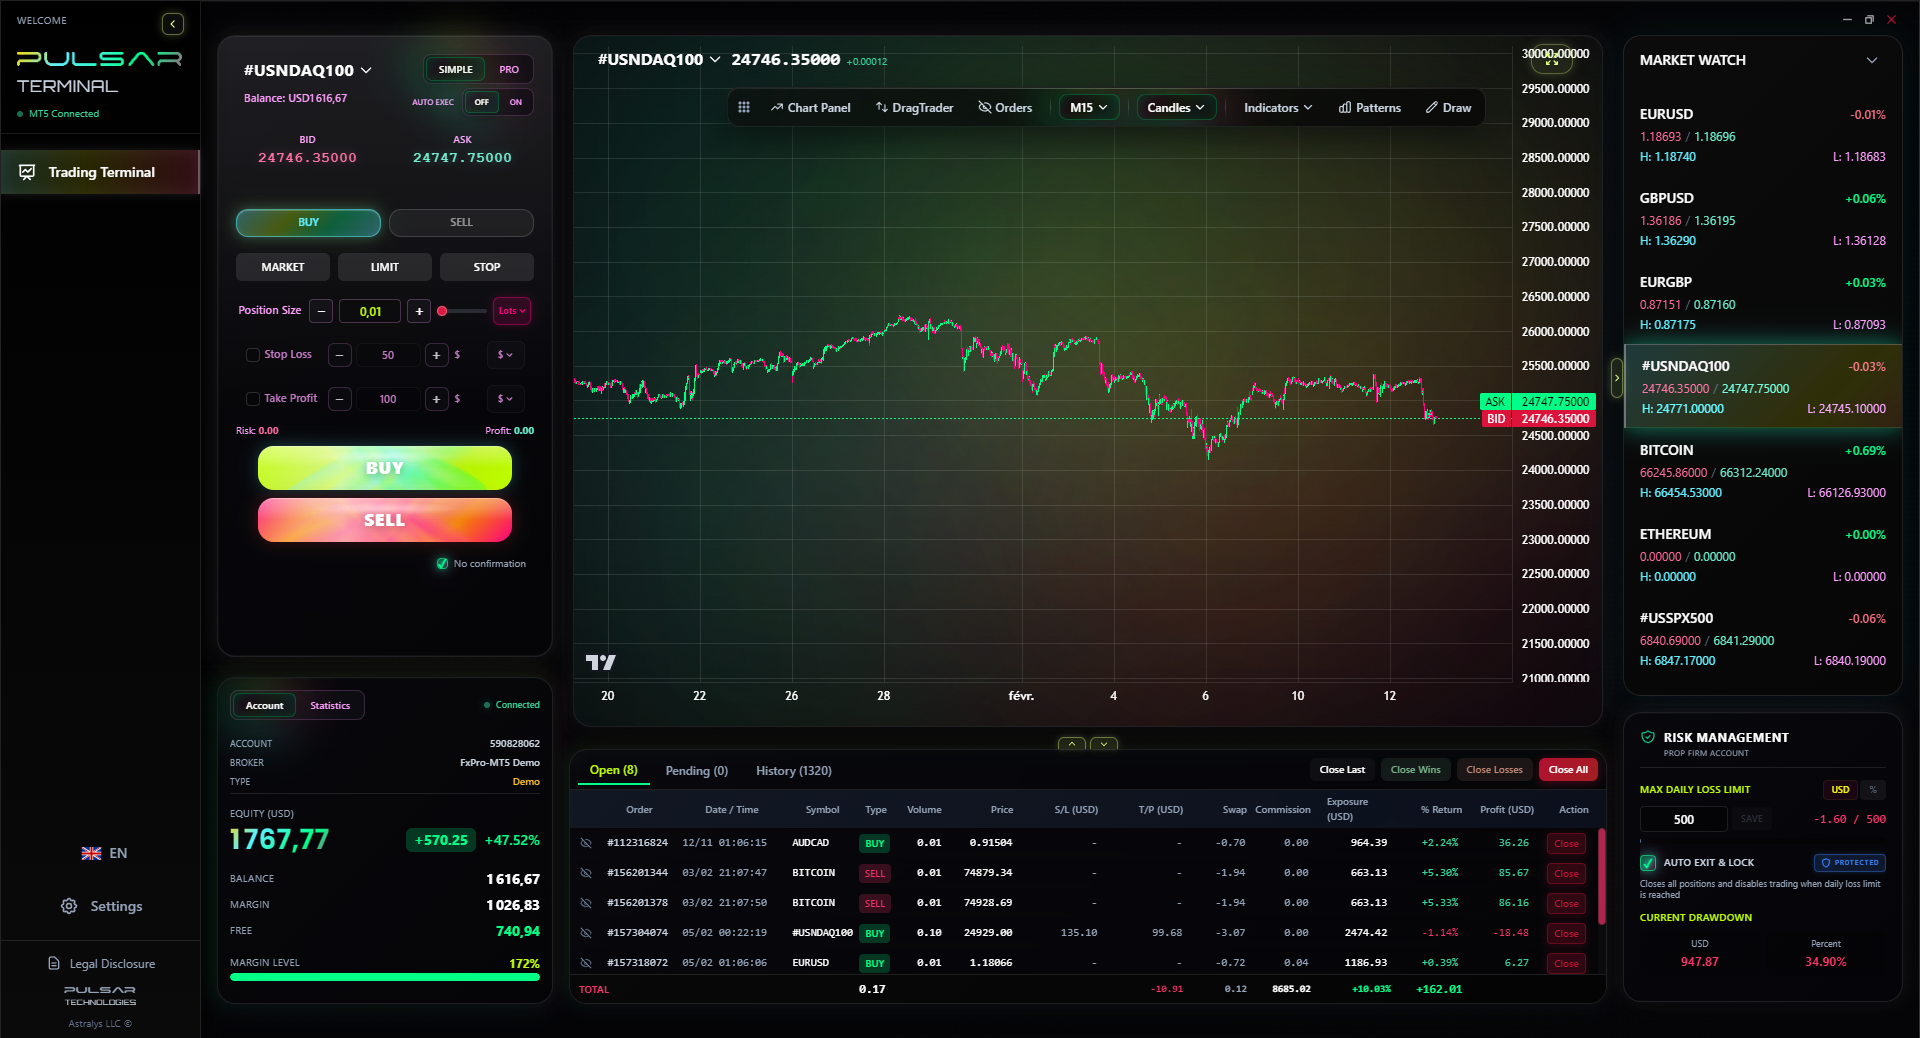
Manually managing complex orders from a fast-moving forex board is stressful; Pulsar Terminal lets you drag and drop take-profit and stop-loss levels directly onto your MT5 chart, turning price alerts into executed plans in one fluid motion.
Pulsar Terminal
The all-in-one MT5 companion: drag-and-drop orders, multi-TP/SL, trailing stop, grid trading, Volume Profile, and prop firm protection. Used by 1,000+ traders daily.
New traders often confuse these two. They work together, but have different jobs.
Think of it this way: The forex board is your satellite view. It shows you everything happening at once across the entire market. It answers the question: "What's moving right now and where is the price?" It's for scanning, monitoring, and quick execution.
The trading chart is your street-level map. You drill into one pair, like EUR/USD guide, and analyse its specific path. It's where you draw trendlines, apply the RSI indicator or MACD indicator, and identify your exact entry, stop-loss, and take-profit levels.
Here’s my workflow:
- Scan the Board: I see GBP is strong, JPY is weak. GBP/JPY is up 1.2%, leading the pack.
- Switch to the Chart: I open the GBP/JPY 4-hour chart. I see it's approaching a key resistance level from last month.
- Plan the Trade: I decide to wait for a pullback to a support zone to go long, with a stop below the daily low.
- Back to the Board: I set a price alert on the board for that support zone. When it hits, I use the board's one-click trade function to execute while my analysis is fresh.
The board informs the what, the chart informs the how. Don't try to do your technical analysis on the forex board, and don't try to get a broad market overview from a single chart.
💡 Winston's Tip
If you feel the urge to trade based solely on a number moving on the board, close the platform. Go for a walk. That's not trading, it's gambling.
“I lost R1,200 in under a minute because I didn't understand the most important column on my screen: the spread.”
Once you've mastered the basics, you can use the board for more sophisticated strategies.
Correlation Checks: I keep a watchlist of correlated pairs. If I'm long on AUD/USD (betting on a strong Aussie dollar), I'll quickly glance at NZD/USD and USD/CAD on my board. If AUD/USD is rising but NZD/USD is falling, my thesis might be weak. The board gives me that cross-check in seconds.
Carry Trade Monitoring: For pairs with a big interest rate differential (like ZAR/JPY historically), the board shows the price action, but the real story is in the swap rates. While you can't see swaps on the main board, seeing a steady, trending move on a high-yield pair can prompt you to check the swap calculator to see if a long-term swing trading position could earn you 'overnight' interest.
Volume Spikes (Where Available): Some platforms show tick volume on the board. A massive spike in the 'Ticks' column for USD/ZAR, with little price movement, can indicate accumulation or distribution. Big players are moving in, and a breakout is often coming. It's a silent alarm bell.
Finally, remember the board is a snapshot. It doesn't show you why the price is moving. A sudden 30-pip drop in USD/ZAR could be a major bank executing an order, a news headline, or a technical breakdown. The board tells you what happened. Your job is to use charts and news feeds to figure out why, before deciding to follow or fade the move.
FAQ
Q1Is the price on the forex board the price I will definitely get?
No, not always. The prices are indicative. During normal market conditions, you'll usually get a price very close to what's shown. During fast markets or low liquidity (like around 5pm SA time when London closes and New York hasn't fully opened), you can experience slippage. Your order may fill at a worse price than the one on the board. This is why limit orders are often safer than market orders.
Q2Why does the spread on USD/ZAR change so much?
The South African Rand (ZAR) is an emerging market currency. It's less liquid than the US Dollar or Euro. Liquidity dries up overnight (SA time) and during local public holidays. Brokers widen the spread to account for the higher risk and cost of securing the currency to fill your order. It's also wider around major economic releases from SA or the US that affect the pair.
Q3Can I trade directly from the forex board?
Yes, absolutely. In most platforms, you can right-click on a pair and select 'New Order', or better yet, enable a 'One-Click Trading' feature. This lets you buy or sell with a single click, using a default order size. This is essential for fast-paced trading styles, but be careful - it's easy to make a costly mistake if you click the wrong button.
Q4What's more important for a beginner, the chart or the board?
Start with the chart. You need to learn technical analysis and risk management first. The board becomes crucial once you have a strategy and need to monitor multiple markets or execute quickly. Trying to use the board without understanding concepts like pip definition, spread definition, and margin call is like trying to fly a jet before you can drive a car.
Q5My broker's board shows a different price for USD/ZAR than the news website. Who is right?
Both are 'right,' but they might be showing a slightly different snapshot in time or a composite feed. Brokers have different liquidity providers, so prices can vary by a pip or two. Always trust the price on your own trading platform for execution purposes. The news site price is for information only.
Q6How many pairs should I have on my board?
As few as possible. I recommend 10 or fewer when you're starting. Only include pairs you have studied and understand. Having 50 pairs is distracting and leads to 'noise trading' - jumping into moves just because you see them, without a plan. Quality of attention over quantity of information.
Prof. Winston's Lesson
Key Takeaways:
- ✓Always check the spread column before any trade.
- ✓Sort and colour-code your board for instant recognition.
- ✓Use the daily high/low as free support/resistance.
- ✓Set price alerts; don't stare at the board.
How useful was this article?
Click a star to rate
Weekly Trading Insights
Free weekly analysis & strategies. No spam.
About the Author
David van der Merwe
Emerging Markets Trader
Johannesburg-based trader with 11 years in emerging market currencies. Specializes in ZAR pairs, FSCA-regulated trading, and South African market analysis.
Comments
Risk Disclaimer
Trading financial instruments carries significant risk and may not be suitable for all investors. Past performance does not guarantee future results. This content is for educational purposes only and should not be considered investment advice. Always conduct your own research before trading.
You Might Also Like

Cara Trading Forex Sukses: 7 Prinsip dari Trader Profesional
Cara trading forex sukses dengan 7 prinsip trader pro: manajemen modal, disiplin, journal trading, backtest. Data nyata, bukan janji profit palsu.
Jam Trading Forex Terbaik untuk Trader Indonesia: Panduan Lengkap dengan Tabel Waktu
Panduan jam trading forex untuk trader Indonesia. Tabel 4 sesi dunia, jam emas 20:00-00:00, sesi mana yang harus dihindari. Data akurat + tips dari trader berpengalaman.
Top 5 Sàn Forex Uy Tín Nhất 2026: Review Jujur dari Trader Indonesia
Top 5 sàn forex uy tín 2026 untuk trader Indonesia. Review jujur: spread, deposit, withdraw, dukungan lokal. Exness, XM, IC Markets & lebih.
Get Pulsar Terminal
All these calculators are built into Pulsar Terminal with real-time data from your MT5 account. One-click position sizing, automatic risk management, and instant calculations.
Get Pulsar Terminal