
For years, I chased the perfect entry, convinced the 'area of value' was some magical line on a chart that guaranteed profits.

David van der Merwe
Trader de Mercados Emergentes ·  South Africa
☕ 10 min de lectura
Lo que aprenderás:
- 1What Exactly Is an 'Area of Value'? (It's Not What You Think)
- 2Building Confluence: The South African Trader's Toolkit
- 3The ZAR Reality: Costs, Spreads, and Why Your AoV Must Be Bigger
- 4A Real Trade: Finding and Trading an AoV on Gold (XAU/USD)
- 5The Mind Game: Common Psychological Traps in the AoV
- 6Why Your Broker Choice Directly Affects Your AoV Success
- 7Your Action Plan: From Concept to Consistent Practice
For years, I chased the perfect entry, convinced the 'area of value' was some magical line on a chart that guaranteed profits. I blew up two accounts looking for it. The truth is, an area of value isn't a crystal ball. It's a calculated zone where price action meets probability, and if you don't understand the local costs and psychology, you're just gambling with your rands. Let's set the record straight on what this concept actually means for a trader sitting in Johannesburg or Cape Town.
An area of value (AoV) is simply a price zone where, based on your analysis, the risk of entering a trade is justified by a higher probability of the market moving in your favour. It's not a single price. It's a zone. Think of it as a 'buying neighbourhood' or a 'selling neighbourhood' rather than a specific house number.
Most new traders get this wrong. They look for a pin-point entry, get faked out by a wick, and miss the move entirely. I did this constantly with USD/ZAR, trying to pick the exact top or bottom. The market doesn't care about your perfect entry. An AoV gives you room to breathe and manage your position.
It's built from confluence. A single trend line isn't an area of value. But a trend line that aligns with a key Fibonacci retracement level (like the 61.8%), sits near a previous swing high or low that acted as support or resistance, and coincides with a round number? Now you're looking at a potential area where big players might step in. This is where tools like a good position size calculator become non-negotiable, because your stop loss should be placed just beyond this zone, not inside it.
“An area of value isn't a crystal ball. It's a calculated zone where price action meets probability.”
Start with Structure
Before you draw a single indicator, you need to see the market's skeleton. Identify the clear higher highs and higher lows (uptrend), or lower highs and lower lows (downtrend). On ranging markets, mark the clear support and resistance boundaries. In South Africa, with our 30:1 use limit from the FSCA, you can't afford to trade against the dominant structure. I learned this the hard way shorting a strong uptrend in Gold (XAU/USD) because the RSI indicator was 'overbought'. The trend ate my account for breakfast.
Add Key Levels
This is where local knowledge helps. For pairs like EUR/USD, major psychological levels (1.1000, 1.1500) and previous weekly highs/lows matter. For USD/ZAR, watch for levels where the SARB might have intervened historically, or big round numbers like R18.50 or R19.00. These areas often see clustered stop losses and pending orders.
Use Indicators as Filters, Not Signals
I don't use indicators to tell me when to enter. I use them to confirm the strength of my AoV. A common setup I use: price pulls back into a support zone in an uptrend. I'll wait for the MACD indicator histogram to start curling back up from below the zero line, showing selling momentum is fading right in my area of value. That's the confluence I need.
Warning: Don't indicator-stack. Two, maybe three, confirming tools are enough. More than that and you'll get conflicting signals and freeze. I've sat there with 7 indicators on my chart, paralyzed, while the perfect trade ran without me.

💡 Consejo de Winston
The market's memory is in the peaks and troughs. Your most reliable areas of value will often form around previous major swing highs and lows, especially those that align with round numbers.
“Your zone needs to be wide enough to absorb the spread and still leave room for profit. A 150-pip spread eats half a 300-pip target.”
Trading an area of value from South Africa isn't the same as trading from London. Our costs structure demands a wider berth.
Let's talk numbers. If you're trading USD/ZAR with a local broker like Khwezi Trade, spreads can be decent, say 40-50 pips. But on exotic crosses like GBP/ZAR or EUR/ZAR with an international broker, spreads can easily blow out to 150-200 pips during off-peak hours. That's not a typo.
Here’s what that means for your area of value: Your zone needs to be wide enough to absorb the spread and still leave room for profit. If your anticipated profit zone is only 300 pips away, a 150-pip spread immediately eats half your potential reward. This makes scalping strategy on ZAR pairs incredibly difficult for most retail traders.
| Pair | Typical Spread (Pips) | Implication for AoV |
|---|---|---|
| EUR/USD | 0.8 - 1.2 | Standard, AoV can be tighter. |
| USD/ZAR | 40 - 80 | AoV must be wider, avoid tiny zones. |
| GBP/ZAR | 120 - 200+ | Need a very wide value area & target. |
My mistake? I used the same 20-pip zone for USD/ZAR that I used for EUR/USD. The spread alone would often trigger my stop loss before the trade even had a chance. Now, I only look for AoVs on ZAR pairs where the distance to my first profit target is at least 3-4 times the average spread. This naturally leads me to longer-term swing trading setups.
“Your zone needs to be wide enough to absorb the spread and still leave room for profit. A 150-pip spread eats half a 300-pip target.”
Let me walk you through a recent trade. It wasn't a home run, but it shows the process, warts and all.
In early March, Gold was in a strong, clear uptrend. It pulled back from around $2080 to $2025. My job was to find an area of value to join the uptrend.
1. Identifying the Zone:
- Structure: The overall trend was up. The pullback was a series of lower lows and lower highs (a downtrend within the uptrend). I wanted to buy the dip.
- Key Level: The $2020 level was a previous resistance area from January that had turned into support in February. A major psychological level.
- Fibonacci: The pullback from $2080 to $2025 was almost exactly a 50% retracement of the prior up move.
- Confluence: The $2020-$2025 zone had structure (end of pullback), a key price level, and a Fibonacci confluence. That was my potential Area of Value.
2. The Entry & Management: I didn't buy at $2025. I placed a buy limit order at $2022, right in the middle of the zone. My stop loss was at $2015, just below the key $2020 level and the 61.8% Fib. My first profit target was at the previous high near $2080.
What happened? Price dipped to $2021.50, triggered my order, and then... it chopped. It sat in my area for two days, even dipping to $2018, putting me in a drawdown. This is the psychological test. I held because my stop was still intact and the AoV logic was sound.
3. The Outcome: It eventually rallied. I closed half at $2060 (a nice win) and moved my stop to breakeven on the remainder. The second half got stopped at breakeven when it pulled back sharply. Final result: a win on half, scratch on half. Not glamorous, but profitable and low stress. That's trading an area of value. For more on trading Gold, our XAU/USD guide breaks down its unique drivers.
Pro Tip: Always enter with a limit order inside your defined zone. Never chase price if it rockets away from your AoV. There will always be another setup. Chasing is how you get filled at the worst possible price.
💡 Consejo de Winston
If you can't immediately see why a zone is an area of value, it isn't one. Confluence should be obvious, not forced. Complexity is the enemy of execution.
“The zone is your entry field. Get in anywhere within it. Waiting for the perfect tick is how you miss the move.”
This is where I've lost the most money. Knowing the concept is one thing. Executing it when your money is on the line is another.
Trap 1: The 'Perfect Entry' Fantasy. You define an AoV between 1.0850 and 1.0870 on EUR/USD. Price drops to 1.0855, then bounces to 1.0860. 'It's not at the bottom of the zone yet,' you think. You wait for 1.0850. It reverses and never looks back. You missed the move. Lesson: The zone is your entry field. Get in anywhere within it.
Trap 2: Widening Your Stop Loss. Price hits your AoV, you enter, and it goes against you, heading for your stop. 'My analysis is still right,' you think. 'The area is just a bit wider.' You move your stop. This is how small losses become account-blowing losses. I did this with a broker that had poor slippage controls, turning a 20-pip loss into an 80-pip nightmare. Your stop is sacred. It defines the boundary of your area of value. If price breaks beyond it, your thesis is wrong. Get out.
Trap 3: Revenge Trading the Zone. Your AoV fails. Price slices through it and your stop is hit. Emotionally, you feel the market 'stole' your money. You immediately re-enter, trying to get back your loss, often in the opposite direction without any new confluence. This is a surefire path to a margin call. After a loss, walk away. The chart will look different in an hour.
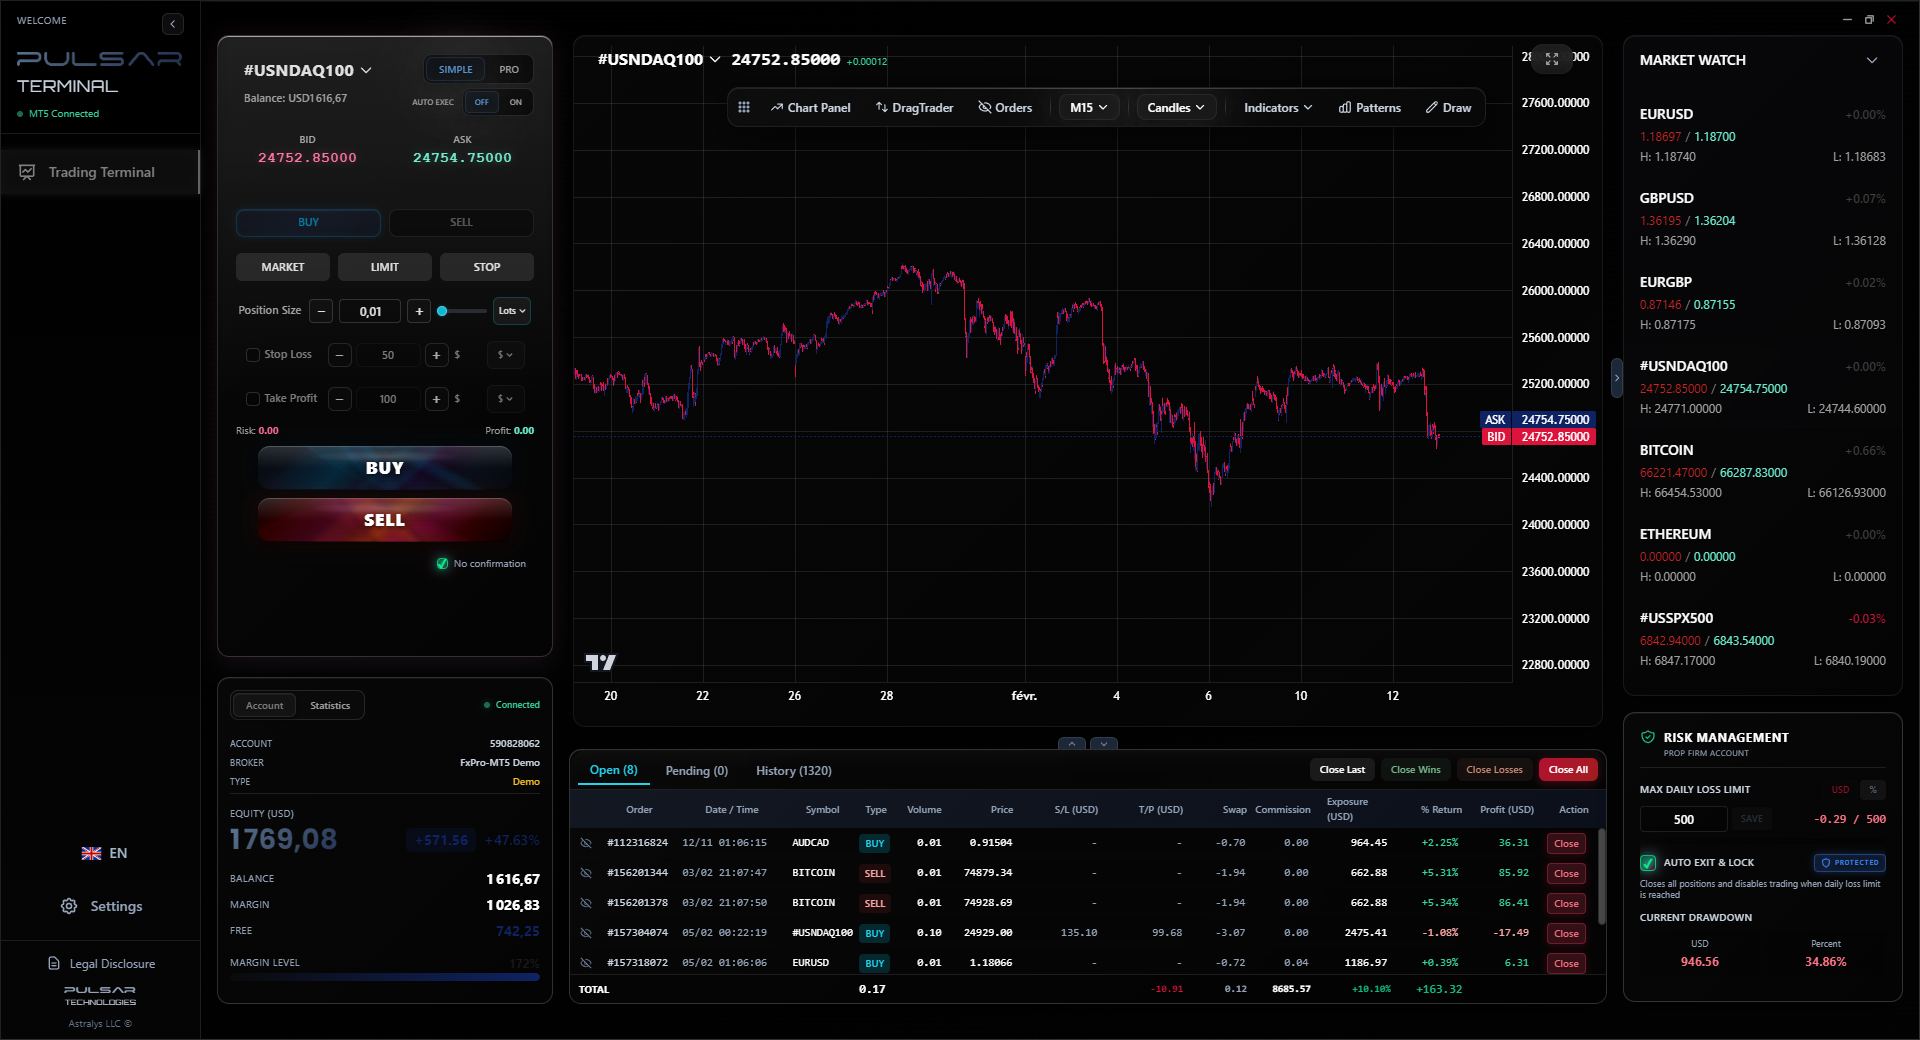
Managing multiple trades within your areas of value requires precision; Pulsar Terminal's drag-and-drop orders and multi-TP/SL features on MT5 let you set your entire plan instantly as price enters your zone.
Pulsar Terminal
La herramienta MT5 todo-en-uno: órdenes drag-and-drop, multi-TP/SL, trailing stop, grid trading, Volume Profile y protección prop firm. Usado por más de 1.000 traders diariamente.
“The zone is your entry field. Get in anywhere within it. Waiting for the perfect tick is how you miss the move.”
Your beautiful area of value analysis can be destroyed by poor execution. This is critical for South Africans.
Regulation & Safety: Always check the FSCA register first. But remember, many international brokers like IC Markets review or Pepperstone review also hold solid global licenses. The key is fund security. If they offer FSCA regulation, even better.
Execution & Slippage: When price rockets into your AoV during news, you need fast, reliable execution. A broker with slow orders or massive slippage can fill you 10-20 pips past your limit, ruining your risk/reward. I've had better experiences with brokers known for raw ECN execution, especially for major pairs.
Spreads & Commissions: As discussed, this is huge. A broker with tight, stable spreads on your preferred pairs makes your AoV easier to trade. Compare the real costs. Sometimes a 'commission-free' broker has a wider spread that costs you more in the long run. Use our Exness review and XM review for detailed breakdowns of their South African offerings.
Platform & Tools: You need a platform that lets you draw easily, set alerts on your zones, and manage trades efficiently. MT4/MT5 are universal, but the broker's plugin or bridge quality matters. Good tools help you monitor multiple AoVs across pairs without stress.
💡 Consejo de Winston
Your first loss in a new area of value is often the cheapest. Adding to a losing position inside a zone is trying to be right, not trying to make money.
“Your stop loss defines the boundary of your area of value. If price breaks beyond it, your thesis is wrong.”
- Start on the Higher Time Frames. Don't look for an AoV on a 5-minute chart. Start with the daily or 4-hour chart to find the major trend and key levels. That's your roadmap.
- Mark Your Zones in Advance. Before the trading day starts, mark 2-3 key areas of value on your watchlist pairs. Use horizontal lines, not just trendlines. Write down why it's an area (e.g., 'Prev. weekly low + 61.8% Fib').
- Set Alerts. Place price alerts at the edges of your zones. Don't sit and stare at the screen. Let the market come to you.
- Have a Checklist. Before clicking buy/sell: Is this in my pre-defined zone? Is the trend with me? Is my stop loss set beyond the zone? Is my risk 1% or less of my account? No to any = no trade.
- Journal Relentlessly. After every trade, screenshot your chart with the AoV marked. Note: Did price respect the zone? Did I follow my plan? What was the spread at entry? This feedback loop is how you improve.
Finding and trading the area of value in forex isn't a secret strategy. It's a disciplined framework for stacking probabilities in your favour. It forces patience, punishes impulsiveness, and when combined with strict risk management tailored to our South African context, it can form the bedrock of a sustainable trading approach. Forget the magic bullet. Focus on the process.
FAQ
Q1Is the 'area of value' the same as support and resistance?
It's related, but not the same. Support and resistance are single price levels. An area of value is a zone built from the confluence of multiple factors, which often includes support/resistance levels, but also adds Fibonacci levels, trend lines, and market structure. Think of S/R as a wall, and an AoV as a fortified neighbourhood around that wall.
Q2What's a good width for an area of value?
There's no fixed number. It depends on the pair's volatility and the time frame. On the daily chart for EUR/USD, a 30-50 pip zone might be appropriate. For USD/ZAR, you might need a 150-300 pip zone to account for higher volatility and spreads. The width should be logical based on recent price swings, not arbitrary.
Q3How do I know if my area of value is invalidated?
Your area of value is invalidated the moment price closes decisively beyond it on your chosen time frame, especially if it takes out your stop loss. A wick into your zone that reverses is a test. A strong, sustained break with momentum is an invalidation. Don't cling to a broken idea.
Q4Can I use an area of value for all trading styles?
It's most applicable to swing trading and position trading where you have wider stops and targets. For scalping, the concept is similar but the 'area' is much tighter and more reliant on immediate order flow. The high spreads on many pairs make finding a true AoV for scalping very difficult for South African traders.
Q5Do professional traders in South Africa use this concept?
Absolutely, but they might not call it that. Institutional and professional traders are always looking for zones of accumulation (buying) or distribution (selling) where they can execute large orders without moving the market too much. They're trading the same areas of value, just with much larger size and more sophisticated risk models.
Q6How does FSCA's 30:1 use limit affect trading areas of value?
It forces better risk management. With lower use, you need a wider stop loss to avoid being stopped out by noise, which aligns perfectly with trading wider areas of value. It discourages the tiny, high-use scalps that blow up accounts and encourages the patience required to trade AoVs effectively.
Lección del Prof. Winston
Puntos clave:
- ✓An Area of Value is a zone, not a price.
- ✓Confluence requires 2-3 technical factors aligning.
- ✓ZAR pairs demand wider zones for spreads.
- ✓Enter with limit orders, never chase.
- ✓A broken AoV means exit, not hope.
¿Te resultó útil este artículo?
Haz clic en una estrella
Análisis Trading Semanal
Análisis y estrategias semanales gratis. Sin spam.
Sobre el autor
David van der Merwe
Trader de Mercados Emergentes
Trader con sede en Johannesburgo con 11 años en divisas de mercados emergentes. Especialista en pares ZAR, trading regulado por la FSCA y análisis del mercado sudafricano.
Comentarios
Aviso de riesgo
El trading de instrumentos financieros conlleva un riesgo significativo y puede no ser adecuado para todos los inversores. El rendimiento pasado no garantiza resultados futuros. Este contenido tiene fines educativos únicamente y no debe considerarse asesoramiento de inversión. Siempre realice su propia investigación antes de operar.
También te puede interesar

Cara Trading Forex Sukses: 7 Prinsip dari Trader Profesional
Cara trading forex sukses dengan 7 prinsip trader pro: manajemen modal, disiplin, journal trading, backtest. Data nyata, bukan janji profit palsu.
Jam Trading Forex Terbaik untuk Trader Indonesia: Panduan Lengkap dengan Tabel Waktu
Panduan jam trading forex untuk trader Indonesia. Tabel 4 sesi dunia, jam emas 20:00-00:00, sesi mana yang harus dihindari. Data akurat + tips dari trader berpengalaman.
Top 5 Sàn Forex Uy Tín Nhất 2026: Review Jujur dari Trader Indonesia
Top 5 sàn forex uy tín 2026 untuk trader Indonesia. Review jujur: spread, deposit, withdraw, dukungan lokal. Exness, XM, IC Markets & lebih.
Obtener Pulsar Terminal
Todas estas calculadoras están integradas en Pulsar Terminal con datos en tiempo real de su cuenta MT5.
Obtener Pulsar Terminal